
Handmade Frankincense & Myrrh Soap Recipe (A Complete Hot Process Tutorial)
NOTE: This article is for my handmade natural soap recipe using the hot process method. This soap is scented with frankincense and myrrh essential oils and colored with Moroccan red clay for a beautiful, skin soothing soap.
Frankincense and myrrh oils are famous for being gifts for Our Lord Jesus from the three kings on the day of his birth. Both of these oils were more valued than gold in those Biblical times. These days, the essential oils are revered for their health benefits, and frankincense (Boswellia spp.), in particular, for its anti-aging and skin healing properties.
I've added some Moroccan red clay to give this soap a lovely light pinkish brown color and also for the extra benefits for your skin.
I love giving Frankincense & Myrrh handmade natural soap as a unique holiday gift! I'm sharing this hot process recipe with you so you can be ready too with an awesome handmade holiday gift for family and friends.
Making hot process soap is very easy! In fact, you can get my free Hot Process Soap Making Checklist by filling out the form at the end of the article. You’ll also get access to the password protected Resource Library for lots of other great information.
I'm not going to add a lot of process pics in this post (another reason you should download the checklist), but if you want to see two really good picture tutorials of the whole hot process soap making method, see this post and/or this post. They're both detailed tutorials with pictures and instructions.
You can also check out my eBook, Hot Process Soap Making: How to Make & Customize Your Own Natural Hot Process Soaps for lots more soaping ideas for gifts and everything you need to know about making your own hot process soap!
You might also be interested in reading about how to use Frankincense Tears and/or Benefits & Uses of Frankincense Essential Oil.
FTC Disclosure: There are affiliate links scattered throughout this article. If you click through and make any kind of purchase, I may earn a small commission at no extra cost to you.

Frankincense & Myrrh handmade naturally scented essential oil soap is such a great gift for the holidays! Here's an easy recipe for this perfect holiday gift soap using the hot process soap making method. You can make soap that smells lovely, is moisturizing and has lots of skin health benefits, PLUS it's truly Holy Soap for the holidays! #handmadesoap #soapmaking #frankincense #frankincenseandmyrrh #recipes #coldprocess #hotprocess #howtomake #homemadegiftidea #natural #makesoap #essentialoil #healingharvesthomestead
What Does My Frankincense & Myrrh Soap Smell Like?
SUPER WONDERFUL!
It's kind of hard to describe, but the frankincense has a kind of buttery mild piney/woodsy scent that’s refreshing and meditative, and the myrrh has a deep, earthy, smoky scent. I added a touch of peppermint essential oil to sweeten the scent and to bring out the thinner Frankincense notes.
I'm not a "perfumer," but my nose "knows" what it likes! I've played around with this combination a lot, and this blend of essential oils makes a lovely, long-lasting scent in your soap.
Here's the Recipe to Make Frankincense & Myrrh Hot Process Soap:
Ingredients:
NOTE: This is for a 3 pound batch of soap. If you want less or more, just make adjustments.
Lye Solution
15 ounces distilled or filtered water
7.2 ounces food grade sodium hydroxide (lye)
Oil Blend
15 ounces organic Coconut Oil
15 ounces organic Olive Oil
12 ounces Sweet Almond oil
6 ounces Shea Butter
1.5 ounces Castor Oil
Fragrance & Color
2 tablespoons Red Moroccan Clay
1.5 ounces Frankincense Essential Oil for soap making
.5 ounce Myrrh Essential Oil for soap making
.5 ounce Peppermint Essential Oil
**All measurements are in weight, not volume, except for the clay.
NOTE: I tend to have a "heavy hand" with my oils. I just like the scent on the strong side. If you are sensitive to scents, just reduce!
Where Do I Get My Butters, Oils, and Essential Oils (for Soap Making)?
When I first started making soap, this was a BIG question. Where do you get all the stuff? Essential oils, especially are super expensive, especially when you're using them in terms of ounces, not drops. Here's a quick rundown of my favorite places I buy soap making supplies:
I have found that Costco has the best prices on Organic Olive Oil. Once in awhile, I'll buy Coconut oil there for making soap too, but I have found the best place to buy oils, butter, and essential oils (for soap making and room sprays) is online at Amazon or Starwest Botanicals .
I believe the essential oils at Starwest Botanicals are perfect for making soap and for diffusing too!
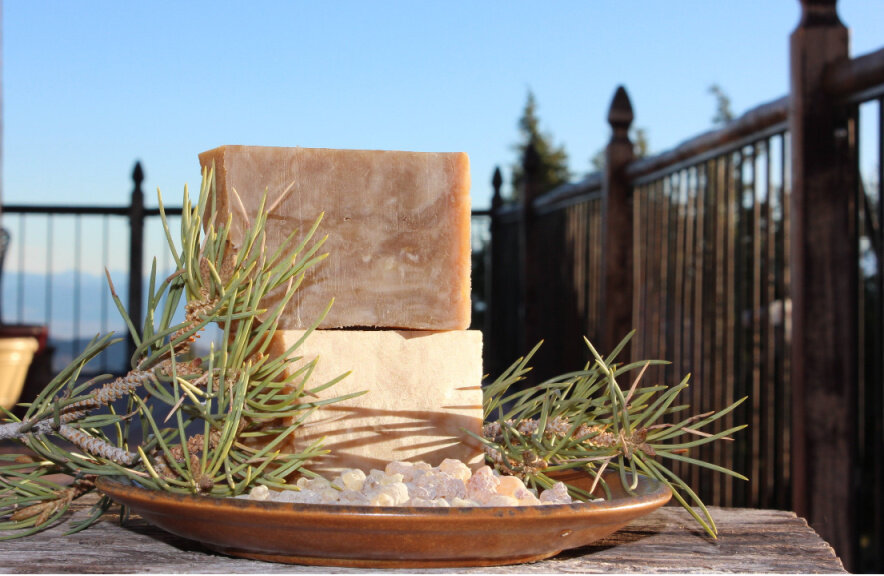
This soap lathers like crazy, lasts a super long time, moisturizes your skin, and the clay adds a nice slip for shaving too. It's one of my favorites all year, and for Christmas, the essential oils and the clay I use makes it especially meaningful.
How to Make Hot Process Frankincense & Myrrh Soap
Directions:
Step 1) Gather your tools:
* Safety Gear, glasses & gloves---wear a long sleeve shirt, too! You can use basic dish washing gloves--they work fine.
* Crock Pot You'll want a large crock pot, in case things get REALLY frothy--my soap has been known to tumble out of the pot once or twice--NOT a good thing. A simple crock pot is fine. You don't need anything fancy. I recommend dedicating a crock pot to only making soap. I have two for soap, and one for cooking. People say, when then walk into my kitchen, "Boy, you sure have a lot of crock pots!" Oh well. :-)
* Wooden Spoons for stirring
* Kitchen scale I have two scales, actually. This one (Ozeri) is great, and I also use a Cuisinart. I'll try to put that one below.
* Measuring cups and pitchers I use Pyrex because it's a great product. ALSO and more importantly, the lye solution needs to be poured into a heat resistant container as it's VERY hot.
* Large knife OR
* Soap Cutter (optional)
* Hand Blender This is an absolute MUST have. It will take FOREVER to get your mixture to trace without it. See the directions below.
Step 2) Add the oil mixture (NOT the essential oils) and the clay to the crock pot.
Step 3) Now get your lye solution ready.
ALWAYS POUR THE LYE BEADS INTO THE WATER....NOT the other way around. You could get seriously hurt by pouring water into lye. And…. are you wearing your gloves and glasses?
I cannot emphasize how important wearing the proper safety gear is. Also----use a heat resistant container for this part because the lye solution is VERY hot when the lye interacts with the water.
Also, I should mention that you need to keep the lye solution away from children and pets. I know that's probably obvious, but they could be badly burned by both the heat of the mixture (it gets REALLY hot from the chemical reaction) and also the caustic nature of the solution itself.
If you happen to accidentally get any on your skin, rinse with cool water. I've used vinegar before, but water is better I've heard.
Let this solution sit and cool down a little while the oils are melting in the crock pot.
Step 4) Blend your Essential Oils
While you are waiting for the oils to melt, get your essential oils blended. Set aside. You won't use these until the very end.
Step 5) Combine lye solution with the oils in the crock pot
Step 6) Mix the oils & lye solution
Get out your dedicated hand blender, and mix away (Got Your Gloves & Glasses on?). You will need to mix it until it's the consistency of pudding. This is called "trace."

Learn everything you need to know to create your own natural soaps with confidence in my soap making course: How to Make Natural Handmade Soap
Step 7) The Cook---
Put your crockpot lid on, and hang around for 20 - 45 minutes---maybe even less. You will see the chemical changes in the oils as the lye solution "saponifies" them into soap! You'll see some different stages:
First Stage, the mixture will turn hard and opaque
Second Stage, it will start bubbling and rising---getting frothy. Once a lot of it is frothy, STIR, STIR, STIR it down. It will calm right back down. You may still have some opaque pieces. That's ok. Just cook some more.
Third Stage, you may see another "froth" rising up, especially if you still had a lot of opaque bits. Just stir it well again. Some people call this the "mashed potato" stage, because that's kind of what it looks like.
Fourth Stage, eventually, it will turn a bit waxy and translucent. With the clay added, it's a little harder to see the translucency, but you can pretty much tell. Now is the time to test it to see if it's done.
Step 8) Test the soap to see if it's done.
Take a small bit (careful, it is VERY hot) and roll it around between thumb and finger. It should feel just like wax. If this is the case, then do the "ZAP" test. Place it lightly on your tongue. If it "ZAPS" you (you'll KNOW if it does), then it's not done, or perhaps you made a mistake somewhere (this has happened to me, and I talk about it in this post).
Step 9) I LOVE this step. Add your essential oils---
Here is where you turn off the crock pot and let it sit for a couple of minutes. Then pour in your essential oil blend and stir like crazy until it's mixed in well. If you are using a very volatile oil, you may need to look away while you do this part because it can be pretty strong. Your house will smell AMAZING for a LONG time!
Step 10) Put the soap into your mold.
Now, using a wooden spoon, put the soap into your mold. I use a silicone soap mold. Push it in there really good to be sure there are no air bubbles. You may have a "top" like a loaf of bread.
You can cut this off when it cools down after about 45 minutes if you want a nice smooth top. My husband and I cut this top up and use it. We don't care if it's pretty or not. The other thing you can do with it, if it's still warm, is mold the loaf top into soap balls---these are also great for gifts!
Step 11) Cool your soap, then remove the loaf from the mold
I let my soap sit overnight so it's completely cooled down. The nice thing about silicone molds is that you can just peel it away from the sides of the soap very easily. You can go ahead and cut it up now, OR just leave it in loaf form and cut up as needed. It lasts a LONG time this way!
That's it! For detailed picture tutorials, see this earlier post. Or this one as well if you’re new to making soap.
This whole soap making process takes about two hours, not counting the time it takes the soap to cool down in the mold.
NOTE: About curing time…. With the hot process soap making method described here, you don’t need to cure your soap for four to six weeks as is often recommended for cold process soap making. This is a big plus if you’re making soap on time constraints. Usually the soap needs just a few days with the hot process method to fully evaporate any excess moisture and harden the soap, but it’s just fine to use right away, too!
NOTE: Don’t forget to download the Free Hot Process Soap Making Checklist below!

Have you wanted to learn how to make customized home remedies that are safe, effective, and really work? Well, now’s the time! Take my free 5-day herbalism course and be on your way to making home remedies with confidence and save money while you’re at it! Click HERE now!
Final Thoughts
I just love this soap. In fact, I make this soap throughout the year because it's such a nice-scented soap--not too sweet, not too manly, not too anything but delicious---I think it's perfect! For making and giving as gifts for the holidays, it's a great choice!
I hope you enjoy this recipe! I'd love to know about your soap making adventures.... Please leave comments! Especially if you have questions or other great ideas, we'd love to know what you think!
Hugs, Health, and Self-Reliance!
Heidi
P.S. If you haven't done this yet, sign up for our newsletter! You’ll also get immediate access to the free Resource Library, which includes the free Hot Process Soap Making Checklist! Enjoy! :-)
Just complete the form below:
Disclaimer: These are my simple directions. Please do extra research on soap making and take all the precautions needed. I'm not responsible for mistakes or injuries.