
HOW TO MAKE YOUR OWN HOT PROCESS SOAP! My Favorite, Natural, Hot Process Soap Recipe: A Picture Tutorial
This article is about making natural handmade soap using the hot process method, a special method that uses heat. Hot process soap is my favorite method of soap making. It’s fast, simple & easy, and you can use the soap the very next day. This post is a detailed picture tutorial with complete instructions so you can make your own handmade hot process soap with confidence. The recipe I’ve included here is one of my most popular, BEST soaps.
Other questions you’ll get answered here include how long does it take to make hot process soap? Can you make hot process soap on the stove top? Is it ok to use a cold process soap recipe with the hot process method?
As a teacher of natural handmade soap making, I’ve discovered one of the biggest reasons people don't make their own soap, even though they REALLY, REALLY want to, is they are afraid of working with lye.
I know this...because I had this same problem when I first started making handmade soap, and I've talked to many others who are afraid of working with lye too. If you are a beginner to handmade soap making, maybe you feel this way?
If so, never fear! I'm about to make those fears go away so you’ll have the confidence to make your own soap!
In this step by step hot process soap making tutorial, you'll find directions that are easy, clear, and will help you get started on your handmade hot process soap making journey armed with all the knowledge you need!
It's actually easy to make handmade soap using a simple crock pot! (Which is why hot process soap is often known as “crock-pot soap.”)
NOTE: Get the FREE Soap Making Checklist by completing the form at the end of the article!
**********
I remember standing there before my very first soap making session, all decked out in my HAZMAT gear (seriously--lol), and my husband is looking at me with his worried face. "Are you sure you want to do this?" he asked.
I took a deep breath, and said, "YEP. I'm going to do this. I AM going to make my own soap."
**You might be wondering why on earth I’d even want to make my own soap?
Well, one of the main reasons is because I had just learned about all the seriously endocrine-disrupting, carcinogenic chemicals the FDA allows in our commercial products here in the U.S. It’s serious….and people aren’t aware. You can find out more about the Killer Toxins Lurking in Your Commercial Soaps, if you’d like.
All that research. All the searching for great articles about the process. All the reading of the only book I could find that mentioned hot process at that time....And I was ready.
**And maybe you’re wondering why I chose hot process soap to try? You can find out about the differences between hot process and cold process soap making here.
I remember that first time like it was yesterday, even though it was many years ago. I also remember how little information about hot process soap there was out there on the web too! Not much, my friend. Not much.
So I'm sharing my best, no-fail hot process recipe with you that just always works, along with super clear directions to help you get started on your own soap making, whether it's just for your family or you want to start a soap business!
The soap recipe in this instructional article is truly all natural. For fragrance, I use essential oils, and for color, I use herbs and/or clays. Once you've made a few loaves of hot process soap, you'll want to start experimenting with your own natural additives!
NOTE: You may want to consider my step-by-step video course on making your own natural soap. Not only are there videos, but there’s also printable text, and my popular and complete 93 page guide to hot process soap making is included!
Here’s a link in case you’re interested: Natural Hot Process Soap Making (tons of recipes with different textures, herbs, colorants, and scent blends as well).
Why You Should Make Hot Process Soap
Hmmm….I just dawned on me: Are you wondering why I love making hot process soap instead of cold process?
Here is an article that explains the similarities and differences between the two methods: Cold Process vs. Hot Process Soap Making. I tried to be unbiased between the two methods, as many soap makers usually love one more strongly over the other.
Hot process soap has these characteristics which make it an excellent choice:
It’s ready to use right away—-there is a very short (and sometimes no) cure time involved.
It doesn’t take long to make. A typical hot process soap making session takes around 1 1/2 to 3 hours at most.
You get to watch your soap “cook.” This is the saponification process, which is sped up with the hot process method. There are no mysterious reactions happening that you cannot see and fix, if need be. With cold process soap making, you never quite know how it’s going to turn out until you remove it from the mold.
With some technique, your hot process soap can look nearly the same as cold process soap.
The scent lasts longer in hot process soap.
You can find out more about the differences and similarities between the styles of soap making in the article linked above.
Have you been wanting to make your own handmade soap? This is a no-fail hot process soap recipe with a step-by-step tutorial including pictures so you can learn to make your own soap! Make soap with confidence! Use it right away! Hot process is my favorite method for making homemade soaps, and I think you’ll love it too! #howtomake #soap #hotprocess #tutorial #instructions #diy #recipe #healingharvesthomestead
Here we go with the detailed picture instructions for my favorite hot process soap recipe!
Get ready to find out the various stages hot process soap goes through with pictures so you can compare when you make your own soap for the first time. Hot process soap takes about an hour to three hours, give or take; and you'll be able to use your hot process soap the very next day.
FTC Disclosure: This post contains affiliate links for your convenience. If you click through and make any kind of purchase I may earn a small commission at no extra charge to you.
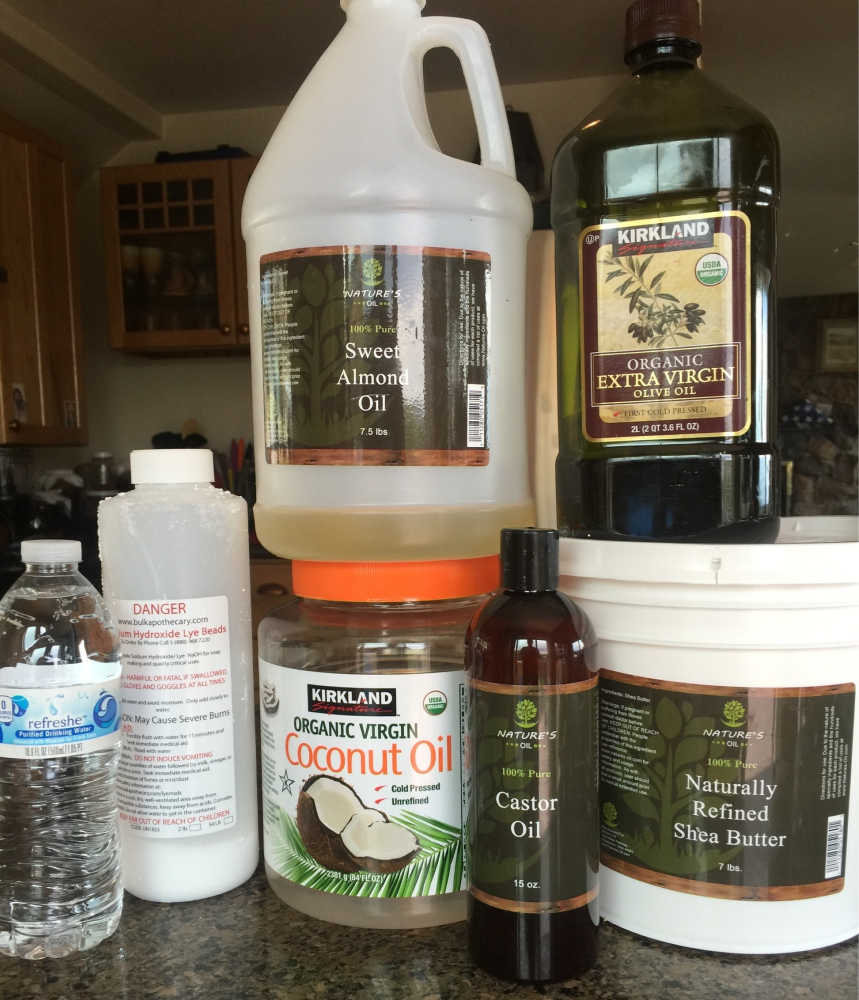
Here are the basic ingredients for making this hot process soap--not including essential oils for scent or herbs for color. That's it! Soap making really only entails oils and sodium hydroxide.
A note about lye and soap making safety:
Lye (sodium hydroxide) is an alkaline chemical that reacts with the oils you use. It is what is responsible for turning the oils into real soap. In fact, according to the FDA, you can't call a bar of soap, "SOAP" unless it is made with oils and lye.
That's why, if you take a look at commercial bars of "soap" in the stores, you will not find many (if any) labeled "soap," because they are not made with the natural ingredients of lye and oils. They are now called "cleansing bars" or "beauty bars" or another tricky name. And they are filled with junk chemicals that are often toxic. Just saying.
Another nice thing about making your own soap is that it will retain the natural glycerin, which is a by-product of the saponification (oil turning to soap) process. Glycerin is highly moisturizing and great for your skin. Most commercial cleansing bars have had the glycerin stripped out.
Safety Precautions for Making Soap:
Making soap with lye means you do have to take some safety precautions. You need safety goggles or glasses, plastic gloves, and I like to even wear a long sleeve shirt. Always put your hair back too---it's just better to have it out of the way.
You can get these safety items at any good hardware store! One last safety note: Keep your children and pets out of your soap making area while you are working.

Here are my current safety glasses and gloves. These probably aren't the best gloves to use because they don't go too far up my arm, but for now, they will work. I recommend using dishwashing gloves that fit you well.
Ingredients for My Hot Process Recipe---
This will make about three pounds of soap
LYE SOLUTION:
1) 7.2 ounces of lye (I use food grade) See the links below to find out where I purchase mine.
2) 15 ounces of distilled water
OIL MIXTURE
1) 15 ounces of Coconut Oil
2) 15 ounces of Olive Oil (I like to use organic oils as much as possible, and I have found that Costco has the best price overall for good organic olive oil)
3) 12 ounces of Sweet Almond Oil
4) 6 ounces of Shea Butter
5) 1.5 ounces of Castor Oil
You will need to use a kitchen scale to measure out your ingredients, because they do have to be exact. In fact, the closer you get to the exact amounts, the better your soap will be. I usually try to be within hundredths of an ounce when measuring.
Tools You Will Need to Make Hot Process Soap:
1) A large crockpot
3) Safety glasses and plastic gloves
4) Heat proof containers--I like Pyrex
5) A hand blender
6) A soap mold
**See the note at the end of the article for more information about where I get my tools, oils and supplies.

Click here to learn how to make soap! This complete step-by-step video course explains EVERYTHING, and you’ll feel confident and ready to get started! It’s the course I wish I’d had when I began my soap making journey!
Directions for Making Hot Process Soap:
Step 1) Get Set Up
Set your crock pot on LOW. For this 3 pound recipe you will need a large crockpot.
Step 2) Measure your oils and add to the crock pot
I get the solid oils (Coconut & Shea Butter) measured out first, so they will begin softening--especially in the winter when it's cold! Put these in the crock pot.
Step 3) Get the lye solution going while the oils are melting.
THIS IS IMPORTANT! ALWAYS MEASURE OUT THE WATER FIRST. THEN THE LYE. ADD THE LYE TO THE WATER! You never want to add the water to the lye because you may end up with a volcano---and this can be dangerous!
LYE CAN BLIND YOU OR BURN YOU! So please please remember: ADD LYE TO WATER, not the other way around. Add it slowly, and mix well. This solution will become HOT, so again, please be careful. And...remember your safety gear!
Also---be sure to use a heat proof container---I like a large Pyrex pitcher.
Unlike with cold process soap making, you do not have to worry too much about temperature. I usually let my lye solution sit for a few minutes (away from pets or children) while I get my oils melted down, but you don't have to be concerned too much with how hot or cool anything is with hot process---
That's just another added little perk to hot process soap making. You don't have to be spastic about getting the oils and lye solution to the perfect temperatures.
Step 4) Pour the lye solution into the crock pot with the oils
Once the oils are melted, gently pour the lye solution into the oils in the crockpot.
Step 5) Mix and bring to trace--
Get your stick blender (you really MUST have one of these for soap making) and begin to stir. BE SURE TO WEAR YOUR SAFETY GLOVES & GLASSES! The lye solution is caustic, and the soap mixture will be caustic until the lye is completely cooked out.
Stir until the mixture reaches "trace." This means it looks like thick pudding, leaving hills on the surface. **It is at this point that you can add any colorants like clays or herbal powders if you want. (I'll do an article later about different natural ways to add color to your soap.)
Step 6) Cook your soap---
Now put your lid on and "cook" the mixture. It will not take long, usually about 45 minutes to an hour.
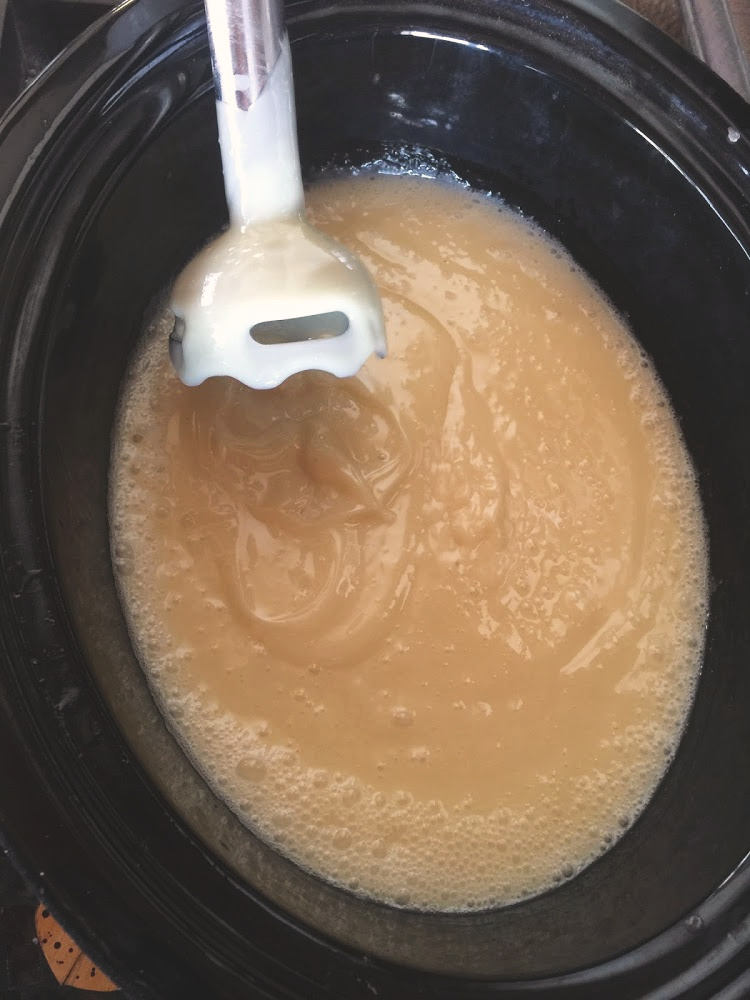
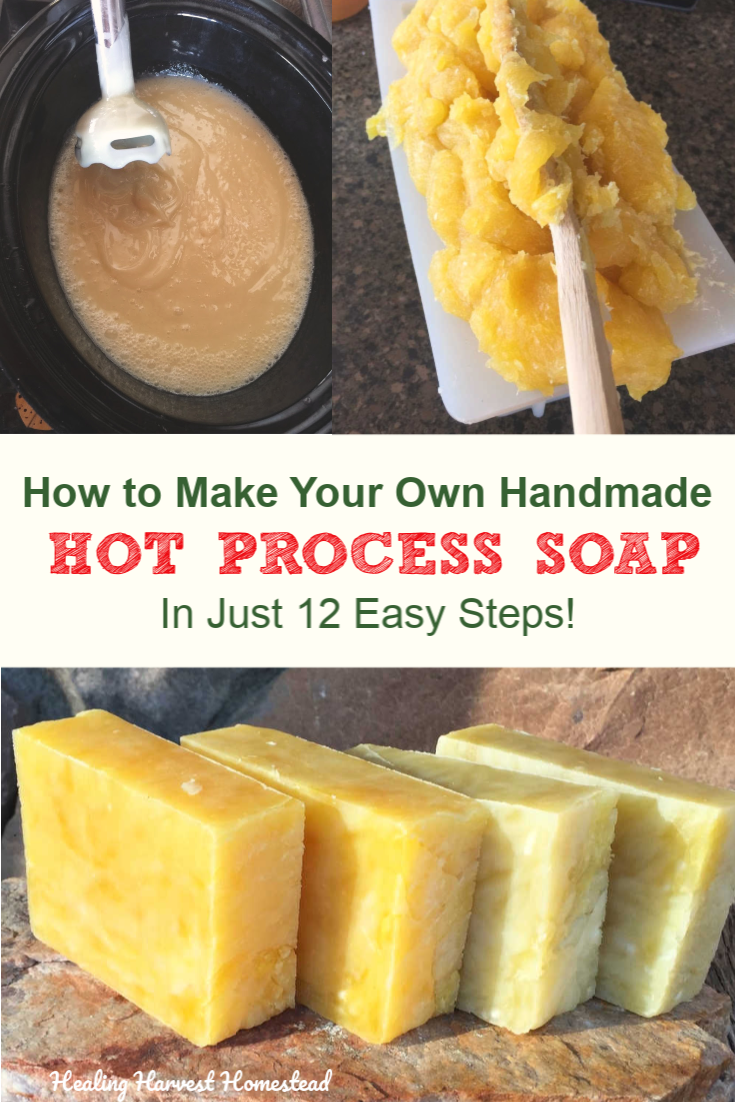
Soap at trace---It should like like thick pudding on top.

This is the first stir. You can still see opaque areas in the mixture--this means it is still caustic and can burn! Plus, it's hot anyway. This stage is often called the “mashed potato” stage.
Step 7) STIR, STIR, STIR!
In the beginning stages of the cook, you will see the cooking mixture rise up the sides of the crockpot, and if everything is REALLY hot, the whole mass will be rising up! This is fine---just STIR, STIR, STIR, and it will calm right down. Then continue cooking. If you see any opaque areas at all, then your soap is NOT ready.
NOTE: Some soap makers insist they do not stir their hot process soap. Honestly, I think a lot depends on the crock pot you are using, because they’re not all the same. In my experience, with the two crock pots I use (both are large, but different brands), I DO stir my soap, and I believe it speeds up the process.
Generally, I stir my soap an average of about three times during the cook.
Step 8) Keep cooking and stirring occasionally. And keep the lid on the crock pot!
You will see it turn into a translucent mass with a gel like consistency. At this point, it is done. This usually takes about 45 minutes to an hour. I tend to let it cook a little longer, even after I think it's ready---Just to be sure the lye is completely gone.

See how translucent it is? It is starting to go through the “gel” stage.
Step 9) How to test to be sure it's ready--the ZAP Test
I've heard good and bad about this next part, but I am a believer in the ZAP test. I used to use fancy pH strips to test for the alkalinity of the soap, but IMHO, the ZAP test works best.
All you do is take a little bit of the soap. It should feel "waxy" in your fingers and begin cooling quickly. Place some on the tip of your tongue. If it "ZAPS" you, it is NOT done. It should just taste like soap, with no tingle or zap.
If you got the ingredients measured wrong, your soap will definitely have a problem and "get" you! I actually burned my tongue pretty good one time when I got the measurement mixed up for one of the oils, so just be careful. If it looks "weird" then it's probably not right.
Step 10) Add your Essential Oils
At this point, while the soap is still in the crockpot, turn the pot off. Let it cool for a minute or two, then you can add your essential oils or scents if you want them. I generally use about 2 ounces or so for a 3 pound recipe, but you can play around with it. Essential oils are very expensive, so this will probably affect how much you want to use.
NOTE: You might be interested in this article: Fragrance Oils vs. Essential Oils: The Pros & Cons of Each.
Step 11) Put the soap into your mold---
Now spoon or pour it into your soap mold! Tamp it down good to get rid of air pockets.

Putting the hot soap into the mold. Press it in well to get rid of any air pockets—-you don’t want those!

You’ll learn everything you need to know about making, customizing, and working with natural materials in your handmade soap! This video course (PDF’s and my eBook also included) walks you step by step through the process so you can make natural soap safely and effectively! Click here for more information!

Here it is, cooling in the soap mold. My molds are a little small for a 3 pound batch of soap, but I just let it cool a bit, then with a sharp knife, slice off the top and form any extra into soap balls. You do this while it’s still a little warm. This is an optional step. The rest of the soap stays in the mold to completely harden. .
Step 12) Cool Completely, Unmold, and Cut to Use--
After it is completely cooled, several hours or even overnight, you can remove the soap block from the mold and cut it!
I actually don't cut my hot process soap right away. I have found that the longer I leave it uncut, the longer my scent lasts too!
You can use it right away! Enjoy!
That's IT! You have beautiful, moisturizing, natural soap!
Frequently Asked Questions About Making Hot Process Soap
1) How Long Does Hot Process Soap Take to Make?
There are a few factors that determine how long your hot process soap will take before it’s ready. In general, most hot process soaps take between 45 minutes to around an hour and a half to cook.
** The Crock Pot: One factor is the heat of the crock pot you’re using. Believe it or not, they all operate at slightly different heat levels. Another crock pot factor is the size of your pot. Larger crock pots will generally cook faster than smaller ones.
** How hot your oils get—-When you melt your oils, the hotter the liquid ends up being before you pour in your lye solution, the faster your soap will cook. However, it’s NOT a good idea to make your oils super hot. Just melt them naturally, then add your lye solution. This is just something I’ve noticed over the years.
** How hot your lye solution is—-When you create your lye solution, it’s HOT at first. I used to worry about the temperature of the lye solution, as you need to monitor it a bit more in cold process. I thought the same was true for HP as well. The fact is, it doesn’t matter, I’ve poured super hot lye solution into my oils with no issues. I’ve also poured cooled solution (because your oils need to be liquid first) into my oils, and it does slow the cook time a bit….but not enough to be concerned.
** Your ingredients matter. Some ingredients, like milks or honey, can change the amount of time it takes to finish your soap.
But generally—-about an hour is a good time frame.
2) Can You Make HP Soap on a Stove Top?
The answer is Yes. You can. I’ve never actually done this myself, so I’m not speaking from experience. But other soap makers I’ve spoken with have used a stove top or even an oven. And remember—-the pioneers created hot process soap by cooking their soaps over a fire in a large pot!
I imagine any low heat source is fine. But these days, the good old crock pot is super easy and standard to use.
3) Can You Use a Cold Process Recipe to Make Hot Process Soap?
Here I’ll say, “It depends.” With that said, I would absolutely NOT assume a cold process soap recipe will work perfectly for hot process. There have been times I’ve tried this, and been terribly disappointed with the results, until I realized that some soap recipes have decreased or added water or oils, which can affect the final outcome. Since I like my hot process soap ready to use fast (at least within a day or so, and no more than about five days for additional moisture to evaporate from the bars for ultimate hardness—this is cure time), I just don’t trust cold process recipes without some checking first.
You see, sometimes CP (Cold Process) soap makers will do a water discount to help their soaps set up faster or other reason or make other changes to the recipe.
Therefore, my suggestion for using a typical cold process soap recipe with the hot process method is to run it through a soap recipe calculator with a 5% super fat. Then follow the measurements given for water and lye.
One I like to use is SoapCalc. It’s not very intuitive at first, but really, once you figure it out, it’s the best calculator I’ve found. I’m still searching for one I like better, and I haven’t found one. Another reason I like the calculator over at SoapCalc is because they give you a range of data for how you can expect your soap to turn out in areas like hardness, lather, cleansing, conditioning, and iodine. It’s really a great free tool.
4) Can You Use the Crock Pot and Other Tools for Cooking Food for Your Family Too?
OK. I do know some soap makers who do use their tools for double duty. However, in my opinion, this is not a good idea for a number of reasons. Remember, sodium hydroxide is highly poisonous. If you’ve thoroughly cleaned your tools, it may be not be likely to have any issues, but still. I do not think it’s a good idea, nor is it best practice.
I strongly suggest using dedicated tools (crock pot, immersion blender, measuring tools, etc.) for soap making only. Keep these completely separate from your food.
Final Thoughts on Making Handmade Hot Process Soap:
If you have other questions about making hot process soap, I’m happy to help! Leave a comment in the comments section below or feel free to reach out to me via email.
Did you know?
You can get a free downloadable hot process soap making checklist + basic instructions you can print and use when you make your own soap! It’s been a life saver for me! Just fill out the form below!
I hope you enjoyed this complete tutorial, and if you are interested in another excellent step-by-step photo tutorial (including pictures of me doing the “zap” test), check out: How to Make Lavender-Rosemary Soap.
There are several other articles for beginners on how to make hot process soap on the blog. You might also enjoy:
"How to Make Natural Soap in a Crock Pot,"
"How to Make Goat Milk & Honey Hot Process Soap,"
"The Secret to Making and Customizing Hot Process Soap,"
"Hot Process vs. Cold Process Soap: Which is Better?"
and Can You Use Milk to Make Hot Process Soap?
There are lots of others on the website, too! Take a look!
And if you want tons of soap recipes that work for hot process, just search “soap” and take your pick! :-)
I recommend reading all you can about making soap when you are just starting out. It builds confidence!
What are your experiences making soap? Leave comments in the comments section if you have questions, want to add anything, or have an experience to share! I love to hear from you!
Hugs, Health, and Self-Reliance,
Heidi
P.S. Remember to fill out this form below to get your free printable soap making checklist PLUS access to all of the resources in the Healing Harvest Homestead Resource Library!
Just complete the form below:

I usually make two batches at the same time in two different crock pots---Here are two of the different kinds of soap bars from today!
P.P.S. Are you interested in some great natural gifts?
You can find other great ideas in this related article: 50+ Natural Gift Ideas You Can Make This Year

Do you want to make your own soap, but you’re afraid of using lye? Do you also want to be able to use your soap right away without the long curing time of cold process soap? Find out how to make your very own handmade natural soap with confidence using the hot process method (aka crock pot soap). This is a complete picture tutorial with clear directions for fast handmade soap. #soap #hotprocess #howtomake #handmade #recipe #essentialoil #natural #crockpotsoap #healingharvesthomestead