
Make Your Own "Easy" Hard Cider!
We have this VERY cool orchard on the outskirts of Las Vegas. It's 40 acres of fruit trees and seasonal vegetables that people can go pick themselves. We are so very fortunate to have that orchard in our community because Las Vegas, Nevada has been under severe water restrictions for a VERY long time. This orchard was started decades ago, and I'm thinking they must be on their own well water outside the city water system. But...I'm not sure about that. I remember when I was a little girl, my dad was able to have a HUGE garden on our acre lot on the outskirts of town. However, in the past 30 years, it has been pretty impossible to garden in Las Vegas, at least on a sustainable scale, because of the water restrictions. (Ironically, the casinos, big businesses, and golf courses seem to get all the water they want with their fountains, "lakes", etc. Hmmmmm.)
So when the orchard opened for the season about four weeks ago, they still had frozen apple cider fresh from their apples last Fall! Oh. My. Gosh! Seriously? So we picked up a couple of half-gallons.... and made Hard Cider---the "Easy" way! (Get it? :-) I'm currently taking a course on herbal fermentation through the New England Academy of Herbal Medicine, and this was a great chance to give a hard cider a try! So---On to how to make hard cider:

It's "EASY" to make hard apple cider! Here's how we made our first batch and how it turned out!
Note: There are affiliate links in this article, and that just means that if you click through a link and make any kind of purchase, I'll earn a very small commission at no extra cost to you! Thank you, and I appreciate your support of Healing Harvest Homestead very much---Heidi
How to Make Hard Cider
Ingredients:
1 gallon of organic, unsweetened apple cider (no additives)
Yeast---I used about 5 grams of bread yeast, but you can use champagne or wine yeast too
Sugar (optional)
Tools You'll Need:
1 gallon carboy (fancy word for jug)
Siphon (it will make your life SO much easier)
Bottles: I prefer the Grolsch swing top bottles because they are easier than capping your own bottles in my opinion. However, for this brew, I just used half gallon Mason jars.
Directions for Making Your Hard Cider
Step 1)
Pour your cider into the carboy. I use a funnel because it alleviates a big mess!
Step 2)
Pitch your yeast (this just means you sprinkle your yeast into the jug)
Step 3)
Attach the airlock and bung.
Step 4)
Let your cider ferment away for two to three weeks. I am a fan of a longer ferment because this ensures all the sugar is used by the yeast.

Pouring the cider into the carboy, using a funnel. You can see all the veggies/eggs/eggshells in the background---sorry for the mess! It's time to make some more calcium powder!

Here we just pitched the yeast, gave it a swirl (don't do that---it just leaves some on the sides), and attached the bung and airlock! Now....to wait.


Here is the cider after a couple of weeks of fermentation. You can see the sediment on the bottom of the jug. That sediment is actually waste from the yeast! Yep! Yeast poo.
Step 5)
Now it's time to rack (bottle) your cider. Using your siphon, if you have one, allow the cider to flow into the jars. You want to avoid getting sediment into the bottles, and the siphon helps keep the sediment at the bottom, too. If you are needing to pour the cider, then just be sure to stop the flow of cider once the sediment starts flowing. You don't want that stuff in your cider!
Step 6)
If you want a slightly carbonated or effervescent cider, then you'll add about 1/2 teaspoon of sugar to the 12 to 16 ounce bottles before (or after) pouring
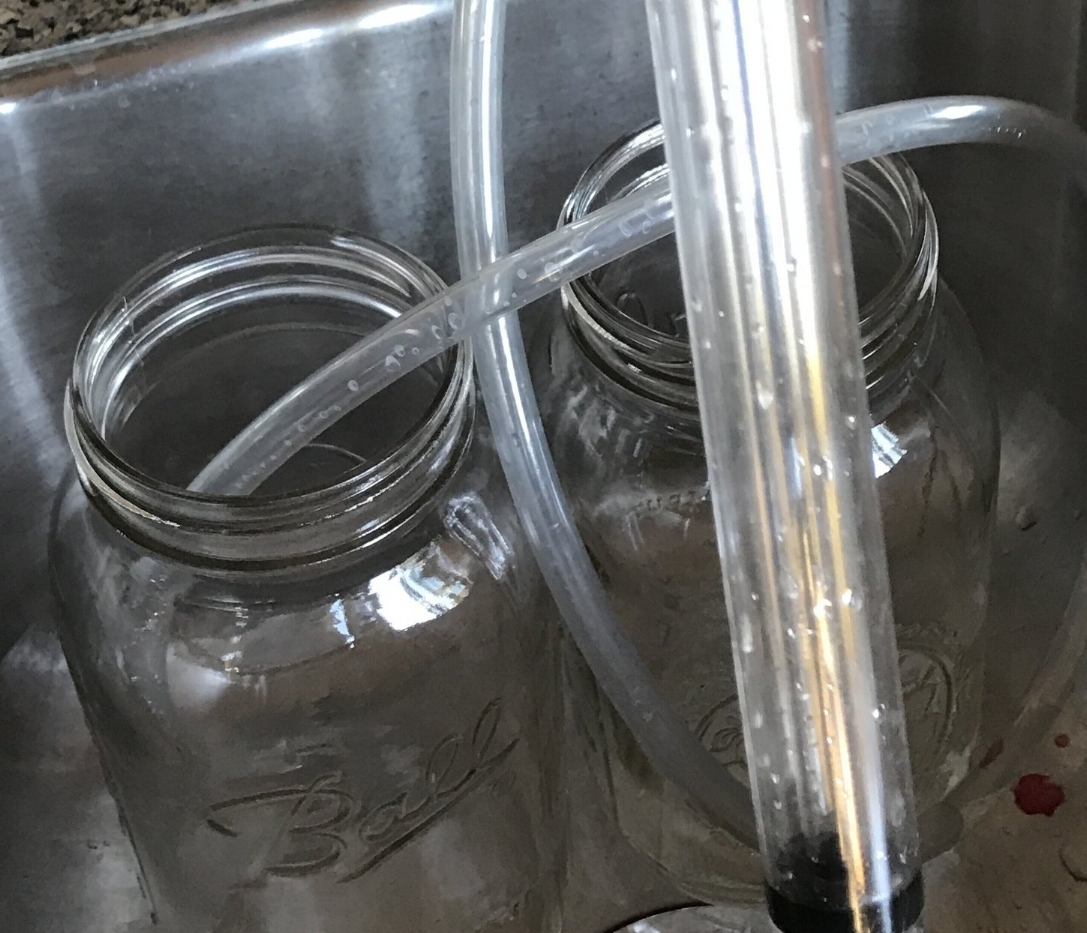
I love this siphon. It has a manual pump with it that helps you control the flow of the liquid.

Ever wished you could create your own tea blends? Find out how, here!

This part is called "racking" the cider. Basically, it's where you bottle it up and let it sit for a week to several more weeks before using it. I was out of my favorite Grolsch swing top bottles, so so I just used these half-gallon Mason jars instead. Plus---this cider probably won't last long enough for it to matter!
Step 7)
Allow your bottles to sit for at least another week, and for many weeks if you want. Your cider will develop more flavors and complexity the longer it sits!
A SAFETY NOTE: Fermented drinks can explode if they are not bottled correctly (and sometimes even if they are). I prefer to use the Grolsch swing top bottles because they are made for pressurized liquids.
In this case, I used half-gallon Mason jars. I could see the pressure building up when the lids starting bowing upward. I just gave them a little "burp" a couple times a week. Now they are in cold storage (the fridge), and they don't need burping as often.

This stuff is REALLY good! Delicious Hard Cider!
That's it! Delicious hard cider!
What Does Hard Cider Taste Like?
Well, ours turned out quite dry. It's not sweet at all anymore, but you can still taste the apple overtones. It's really a lovely beverage to sip on. I didn't test the alcohol content, so I have no idea what it is, but I would say it's probably similar to a strong ale.
EDIT: Mr. V. and I decided to "age" the hard cider for an additional week and refrigerate one of the jars. We also tested the alcohol content (we did take an original reading before adding the yeast). Turns out, it is absolutely LOVELY and will probably become my new beverage of choice! The alcohol content is about 7%, which is the same as a high content beer, but about half what wine is.
I hope you enjoyed this short tutorial on making hard cider! It was fun to do! Please leave comments, questions, etc.! I love hearing your thoughts and ideas!
If you enjoyed this article, you might also like How to Make Your Own Home Brew Part One, Part Two of How to Make Your Own Home Brew, and How to Make Chamomile Ale!
Also, please sign up for the Healing Harvest Newsletter so you never miss a thing!
Hugs & Self-Reliance!
Heidi
P.S. I'm loving your comments! :-) Without you it's boring over here! What do you think of trying out hard cider? Have you made it before? This was my first experience tasting it and making it, and I thought it was delightful! Would love to hear your thoughts/suggestions/questions!
P.P.S. If you haven't already, please sign up for our newsletter and never miss a thing! You'll also get two free eBooks from me: "How to Relax Using Herbs" and "12 Best Essential Oil Diffuser Blends!"
This article was shared on these link parties: Our Simple Blog Hop, The Homestead Blog Hop, the Homesteader Hop, Grandma's DIY, and over at The Homestead Bloggers Network!