
How to Make Handmade Soap in a Crock Pot (An Easy Hot Process Soap Recipe & Tutorial)
NOTE: This is a tutorial on how to make hot process soap in a crock pot. The heat from the crock pot speeds up the saponification process, so you can use your handmade soap faster! This is my favorite method of soap making, and here’s why. Read on to find out how to make soap!
I remember back to the times before I made our own soap and how much I admired those who were able to make their own (I still do admire them). I used to go to the Farmers markets and fairs and spend tons of time smelling and looking at those beautiful soaps. I wanted to make my own SO bad!
I started out making Melt & Pour, because I was afraid of using lye. Finally I took the leap into honest-to-goodness handmade lye soap!
At first, I used the cold process method, just like most soap makers out there these days. BUT! The wait time! I hated waiting six whole weeks to use my beautiful soaps!
Then I learned there is a faster way to make real, handmade soap: The hot process method. I'm lovin' it! Here is a clear and detailed tutorial on how to make your own hot process soap! In a crock pot! :-) Fast, easy, healthy, and immediately useful.

Have you ever wanted to try making your own natural soap? Or, maybe you make soap, but you've never tried the hot process soap making method? Find out how to make beautiful hot process soap in a crock pot! Use it right way, and have lovely natural soaps to enjoy. Here is a hot process soap recipe and a picture tutorial to get you going!
FTC Disclosure: There are affiliate links scattered throughout this article. If you click through and make any kind of purchase, I may earn a small commission at no extra cost to you.
How to Make Hot Process Soap
But First, Why Would You Make Your Own, Anyway?
1) It's highly moisturizing!
Making your own soap means it retains the natural glycerin, which is a by-product of the saponification (oil turning to soap) process. Glycerin is highly moisturizing and amazing for your skin. The soaps you find in the stores usually have stripped the glycerin out to use for other purposes.
2) You'll know your soap is pure and natural.
Weird ingredients? Not with your own soap, at least not unless you choose to add them, that is. You will not have dangerous cancer-causing or estrogen affecting chemicals in your own natural soaps. You'll know exactly what is in it, and that's a peaceful feeling, my friends!
3) It's satisfying and fun.
You get to create something useful and beautiful that is exactly what you want! You choose the textures, colors, and the scent! How cool is that?

Ready to start making your own handmade soap? This video course is a step-by-step course on the soap making process, how to use different natural textures (salt, clay and lots more), natural herbal colorants, and scents with essential oils. My popular soap making eBook and guide that’s been downloaded thousands of times is included as a free bonus! Click for the deets!
Some Quick Info to Know Before You Start:
Hot Process Soap Appearance:
It is not as smooth and polished as cold process soap. It looks a bit rustic, as a matter of fact. But I personally think that just adds to its beauty!
A Note About Lye:
Lye (sodium hydroxide) is a caustic, alkaline chemical that reacts with the oils you use. You need three things to make "true" soap: Lye+Oil+Liquid. According to the FDA, you can't call a bar of soap, "SOAP" unless it is made with lye, oils, and a liquid.
Try this: Take a look at commercial bars of "soap" in the stores, you won't find many labeled as "soap." They are now called "cleansing bars" or "beauty bars" or another tricky name. They are filled with junk chemicals that are often toxic, and are not "true" soap.
Check out my article, Killer Toxins Lurking in Your Soap, for more information.
Safety Precautions:
Using lye to make soap can be dangerous, and you'll need to do some things to stay safe. You need safety goggles or glasses, plastic gloves, and I like to even wear a long sleeve shirt. Always put your hair back too---it's just better to have it out of the way. You can get these safety items at any good hardware store!
Another safety note: Keep your children and pets out of your soap making area for obvious reasons.
How Long Does Hot Process Soap Take to Cook?
The cook time for your hot process soap will vary a little bit between different recipes, the time of the year, and how hot your oils and lye solution are when you start.
Generally, most hot process cook times range from 45 minutes to an hour and a half, max. So your total time investment will be around two to three hours, between preparation and the actual cooking of the soap.

Here are my actual safety gloves and glasses I wear when making hot process soap with lye.

Ingredients for My Hot Process Recipe---
**This will make three pounds of soap. Also, when measuring, you'll need to use a digital scale to weigh everything exactly. We are talking "weight" measurements, not "liquid" measurements.
Lye Solution
** 7.2 ounces of lye (I use food grade, but you don't have to).
** 15 ounces of distilled water
Oil Mixture
** 15 ounces of Coconut Oil (Costco has good prices!)
** 15 ounces of Olive Oil (I like to use organic oils as much as possible, and I have found that Costco has the best price overall for good organic olive oil)
** 12 ounces of Sweet Almond Oil
** 6 ounces of Shea Butter
** 1.5 ounces of Castor Oil
Be sure to use a kitchen scale to measure out your ingredients, because they have to be as exact as possible. In fact, the closer you get to the exact amounts, the better your soap will be. I usually try to be within hundredths of an ounce.
Tools You Will Need to Make Hot Process Soap:
**A quick note about tools: Do not use aluminum, teflon, or non-heat-resistant plastic for soap making. Stick with stainless steel, glass, wood, ceramic, or heat resistant plastic. The lye can react with metals.
1. A large crockpot
3. Safety glasses and plastic gloves
4. Heat proof containers--I like Pyrex
6. A soap mold
Directions for Making Hot Process Soap:
NOTE: One thing that helps me a LOT is having a checklist when I am making soap. You can download my Soap Making Checklist FREE at the end of the article!
Step 1) Set your crock pot on LOW.
Step 2) Measure your oils with the kitchen scale, and place them in the crock pot. A quick tip: I like to add my solid oils (shea butter and coconut oil) to the crock pot first to let them start melting.
Step 3) Get your lye solution going while the oils are melting. Use your gloves & glasses!
THIS IS IMPORTANT! ALWAYS MEASURE OUT THE WATER FIRST. THEN THE LYE. ADD THE LYE TO THE WATER! You never want to add the water to the lye because you may end up with a volcano---and this can be dangerous! LYE CAN BLIND YOU OR BURN YOU! So please please remember: ADD LYE TO WATER, never the other way around.
Pour the lye slowly into the water, stirring carefully as you pour. I like to stop pouring periodically and stir until the lye that's already in the solution is dissolved. The chemical reaction between the water and lye will be HOT, so take care. Be sure you do this part outside (or at least by an open window, as there will be fumes) and away from pets and children.
You'll also want to use a heat proof container. I use a large Pyrex glass pitcher.

Here's lye solutions cooling down outside. I usually make two batches at a time in two crock pots dedicated to making hot process soap!
Step 4) After the oils are liquid, pour the lye solution into the crock pot along with the oils.
Step 5) Mix and bring to "trace."
Put on those safety gloves and glasses!
"Trace" means your mixture will look like thick pudding, leaving little peaks on the surface.

Here's what "trace" looks like....
Step 6) Cook your soap.
Now put your lid on and "cook" the mixture. It will not take long, usually about 45 minutes to an hour. You may have to stir it down one or two times in the process.
Be sure to watch your soap as it cooks, at least the first few times until you get used to what it will do. There have been times I've walked away for a few minutes, only to return to an overflowing caustic mess.
If your soap starts cooking fast, and boiling up the sides and top, just stir it on down.
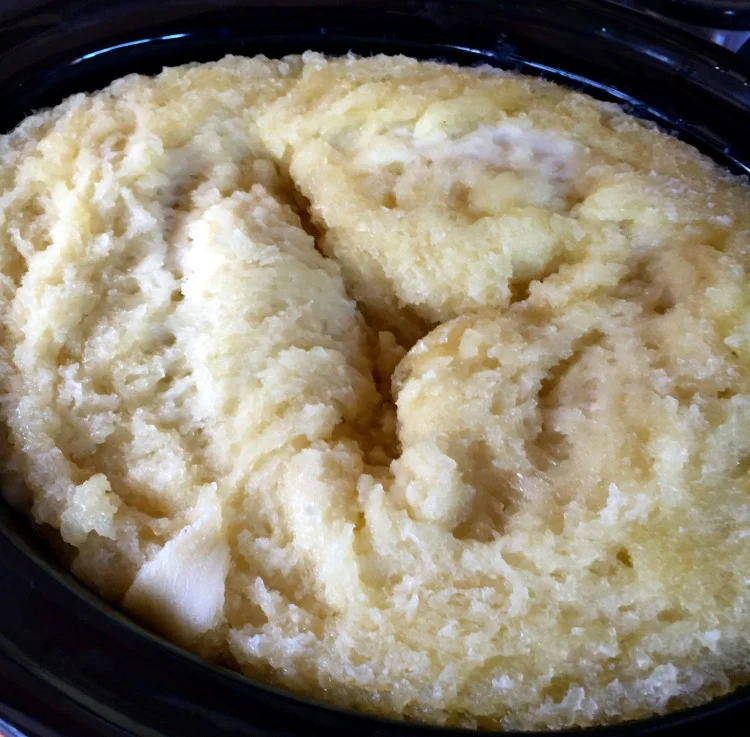
In the beginning stages of the cook, you should see the mixture rising up the sides of the crockpot. This is fine---just STIR, STIR, STIR, and your cooking soap will calm right down. Then continue cooking. As long as you see any opaque areas at all, then your soap is NOT ready.
Eventually, you will see it turn translucent with a gel like consistency. At this point, it is most likely finished. If in doubt, cook a little longer.

The chemical process of saponification is interesting to watch. Here is soap in an early stage of cooking. The center is completely opaque and hard! Like, you can't stir it at all right now. Just wait about 5-10 minutes though. See the outside edges? When more of the soap starts looking like that and bubbling up the sides---it's time to stir it down.
Here's another picture of the "cook" a little while later:
This soap has bubbled up nicely. It's been stirred down twice at this point, and ready for one more stir. See how you can see very little opaque soap left? It's still not ready, because it's not quite translucent and waxy yet. That's where you want it.
Step 7) Test your soap
You can get all fancy and use pH strips to test for normal pH levels, but I've tried this, and honestly, I'm not really a fan. I've found that testing a waxy substance like your cooked hot process soap is kind of hard.
What do I do instead? I use the "ZAP" test.
Take a little blob of your soap. First off, it should feel "waxy," and be malleable. When the little blob is cool enough, just touch it to the tip of your tongue. There should be no reaction whatsoever, and all you'll taste is good old soap.
You'll know if something is not right because your blob of soap will "ZAP" you, if it's either not ready or if you mixed something incorrectly.

Here's a little blob of soap. See how it is translucent and I can mold it---it's waxy, kind of like slightly melted candle wax. Now, for the ZAP test!
Step 8) Here's where you can add scent, if you want.
I only use essential oils in my soap because fragrance oils have chemicals. Even the word, "natural" in fragrance oils means nothing.
Turn off your crock pot. Let it cool for a minute or two, then you add your essential oils. My favorite ratio of essential oils to soap is 1/2 ounce to 1 ounce per pound of soap. I like a heavily scented bar of soap, though, so just play around with scent until you get yours how you like it.
Step 9) Put the soap into your mold
You'll need a spoon for this part, as hot process soap should not be "pourable." Glop it into your mold, press it into the corners with your wooden spoon, and if you want, lift the mold and gently drop it onto the counter to be sure all the air pockets are out.

If you have too much soap for the mold, that's ok. You'll have a kind of "bread" top. You have two choices with it. You can either let it harden and cool, with a very rough, rustic appearance; or you can wait about an hour, then slice the top right off, leaving a smooth top, kind of like cold process soap or the bars in the stores. You can use the top too! Form it into soap balls or just slice & use! Options are awesome, right?
Step 10) Let sit to cool, then remove it from the mold
After it is completely cooled, several hours or even overnight, you can remove the soap block from the mold and cut it!
***I actually don't cut my hot process soap right away. I have found that the longer I leave it uncut, the longer my scent lasts too.
You can use it right away. Enjoy!
A little extra note about using it right away: It's fine to use as soon as it's all cooled. I often use my hot process soap the same day I make it. However, by letting it sit for a few days, any leftover liquid will evaporate, giving your soap even more hardness.
That's IT! You have beautiful, moisturizing, natural soap! Now, when you see those beautiful, handmade soaps at the farmers market and fairs, you'll feel great knowing you can make your own too!
Final Thoughts on Using Your Crock Pot to Make Handmade Soap
Frankly, having been making soap for years, and trying quite a few different methods, hot process soap is by far my favorite. And these days, there are even techniques for getting those fancy swirls that cold process soap makers love to get!
The most important thing, though, is making real and natural soap so you can avoid the hormone-disrupting chemicals that abound in commercial soaps. Making your own soap helps you take good care of your family!
Related articles you might enjoy:
Make Your Own Soap! My Favorite Hot Process Recipe,
Spearmint-Frankincense Soap You Can't Live Without,
How to Make Chamomile Infused Soap
Pumpkin Spice Delicious Soap Recipe
Sexy Wild Man Soap Recipe (men love this!)
And tons more on the website!
Hugs, Health, & Self-Reliance,
Heidi
P.S. If you haven't yet, go ahead and sign up for the newsletter! You'll never miss a thing, plus you’ll get access to the FREE Resource Library filled with eBooks, guides, and lots more, including the Hot Process Soap Making Checklist!
Complete the form below:

Interested in learning how to use herbs for your natural health? Take this FREE 5-Day Herbal Foundations email course and get started making your home remedies to care for your family today!

Isn't handmade soap just beautiful?
Disclaimer: I am not responsible for your use of instruction or any errors made on your part. Soap making can be dangerous. Please follow all directions, and it's a good idea to research more about making soap. Always use common sense when working with chemicals.